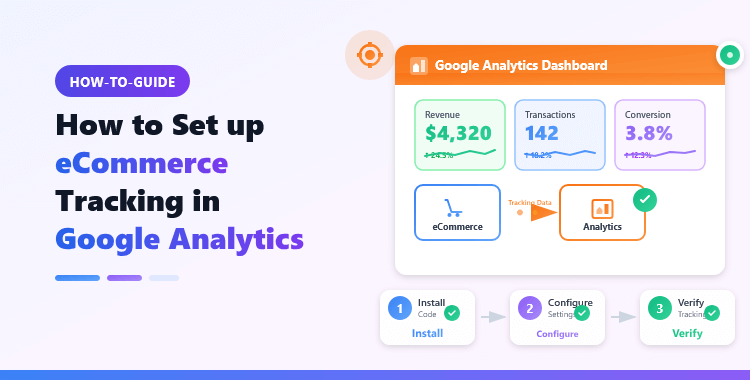
How to Set up eCommerce Tracking in Google Analytics
Maynul
- Reader Disclosure Reader Disclosure: Some of the posts on our site may contain affiliate links. Clicking may earn us a commission at no extra cost to you. Thank you for your support! Read our Disclosure
Understanding customer behavior is key to optimizing your online store’s performance. With eCommerce tracking in Google Analytics, you can gain invaluable insights into how visitors interact with your site, from product views to purchases.
This guide walks you through the essential steps to set up and utilize eCommerce tracking effectively, empowering you to make data-driven decisions that drive growth and enhance user experience.
We will discuss setting up Ecommerce Tracking in Google Analytics so that you can accurately track sales, revenue, conversion rates, and more.
So let’s start uncovering the secrets behind successful eCommerce tracking on Google Analytics!
- What is eCommerce Tracking in Google Analytics?
- Why eCommerce Tracking is Important
- Benefits of using Google Analytics for eCommerce Tracking
- Prerequisites for Setting Up eCommerce Tracking
- Step-by-Step Guide to Setting Up eCommerce Tracking
- Setting Up eCommerce Tracking Directly Adding JavaScript to Your Site
- Step 1: Add GA4 Tracking Code to Your Site
- Step 2: Implement eCommerce Events with Custom Code
- Step 3: Verify Events in GA4
- Setting Up eCommerce Tracking Using Google Tag Manager (GTM)
- Setting Up eCommerce Tracking Using Plugins or Third-Party Apps
- Interpreting eCommerce Reports in Google Analytics
- Frequently Asked Questions
- Conclusion
Key Takeaways:
- Ecommerce Tracking in Google Analytics allows you to monitor your website’s transactions, revenue, and customer behavior.
- Implementing this tracking helps optimize marketing efforts and understand which products perform best.
- Setting up requires a Google Analytics account, an ecommerce website, and administrator access.
- Interpreting reports like the Overview, Product Performance, and Sales Performance helps gauge business health and make data-driven decisions.
- The HT Easy GA4 Plugin simplifies Google Analytics integration on WordPress, offering user-friendly setup and advanced analytics features.
- Use the plugin to track ecommerce data effectively without additional plugins or custom code.
- Regularly monitor ecommerce reports to optimize strategies and enhance business performance.
What is eCommerce Tracking in Google Analytics?
Ecommerce tracking in Google Analytics allows website owners to monitor transactions, revenue, and various other metrics directly from their Google Analytics account. This functionality provides insights into how users interact with your products, from product views to final purchases.
If you run an online store on WordPress, setting up this tracking is essential to understanding your business performance. Ecommerce Tracking in Google Analytics provides detailed insights into sales data, product performance, transaction details, and customer behavior.
This tracking includes metrics such as revenue, conversion rates, average order value, and the effectiveness of marketing campaigns.
Why eCommerce Tracking is Important
Ecommerce tracking is crucial for online businesses to thrive in an increasingly competitive market. The average number of products bought per online order is 4.95. (Statista, 2023)
The US eCommerce market is set for substantial growth, with projected revenue surging by $475 billion from 2024 to 2028 (Statista, 2023). Implementing eCommerce tracking helps you capitalize on this growth by providing insights into customer behavior and sales trends.
This data can help you identify areas for improvement, understand which products are performing well, and track the effectiveness of your marketing efforts. Utilizing this information allows you to optimize your online store for maximum success.
Recommended Blogs for You:
👉 How to Find Referral Traffic in Google Analytics
👉 How to Track Website Traffic Using Google Analytics
👉 Facebook Pixel vs Google Analytics: The Complete Showdown
👉 5 Best WooCommerce Google Analytics Plugins: Unlock the Power of WooCommerce Analytics
Benefits of using Google Analytics for eCommerce Tracking
Implementing eCommerce tracking in Google Analytics offers many benefits for online businesses. Here are some key advantages:
1. Comprehensive Customer Insights
Google Analytics provides detailed reports on customer behavior, including how users navigate your site, which products they view, and their purchasing patterns. This information helps you understand what drives sales and where customers may drop off in the sales funnel.
2. Enhanced Marketing Effectiveness
With eCommerce tracking, you can assess the performance of your marketing campaigns in real-time. You’ll know which channels, such as email, social media, or paid ads, drive the most revenue, allowing you to allocate your marketing budget more effectively.
3. Improved Product Performance Analysis
Track product performance to see which items are top sellers and which may need more marketing support. Product-specific data can help you optimize inventory, pricing, and promotional strategies.
4. Accurate Conversion Tracking
Measure the conversion rate of your eCommerce site accurately. By understanding the percentage of visitors that convert into paying customers, you can identify and address potential issues in your sales process.
5. Customer Segmentation
Segment your customers based on various criteria such as demographics, behavior, and purchase history. This segmentation allows for more targeted marketing efforts, personalized offers, and improved customer retention strategies.
6. Detailed Sales and Revenue Reports
Access detailed reports on total revenue, average order value, and other key financial metrics. These insights enable you to monitor your store’s financial health and make informed business decisions.
7. Cart Abandonment Analysis
Identify where customers abandon their carts and analyze the reasons behind it. Understanding cart abandonment issues helps you implement strategies to recover lost sales, such as retargeting ads or abandoned cart emails.
8. Enhanced User Experience
By analyzing user behavior and identifying bottlenecks in the shopping process, you can make data-driven improvements to your site’s user experience. Enhancing the user experience can lead to higher customer satisfaction and increased sales.
9. Forecasting and Planning
Use historical data to forecast future sales and plan inventory and marketing strategies accordingly. Predictive analytics can help you prepare for seasonal trends and demand fluctuations.
10. Integration with Other Tools
Google Analytics integrates seamlessly with other tools and platforms, such as Google Ads, Google Search Console, and various CRM systems. This integration provides a holistic view of your marketing efforts and customer journey.
Prerequisites for Setting Up eCommerce Tracking
Before you begin, ensure you have the following:
Google Analytics Account
Ensure you have a Google Analytics account. If you don’t have one, sign up at Google Analytics.
eCommerce Website
You need an eCommerce website where you sell products or services online. This website should be integrated with a content management system (CMS) or an eCommerce platform that supports Google Analytics.
Administrator Access
Ensure you have administrator access to your Google Analytics account and eCommerce website. This is necessary for implementing tracking codes and making necessary configurations.
Once you have these prerequisites, you can set up eCommerce tracking to gain valuable insights into your online business.
Step-by-Step Guide to Setting Up eCommerce Tracking
There are several ways to set up eCommerce tracking on your website. Choose the one that best suits your platform and preferences:
- Directly Adding JavaScript to Your Site
- This option involves directly embedding JavaScript code on your website’s pages. You may need coding knowledge or assistance from a developer for accurate setup and customization.
- Using Google Tag Manager
- Using a Plugin or Third-Party App
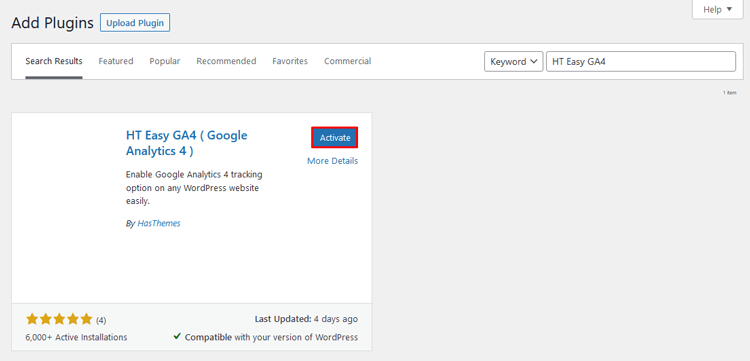
- For WordPress users: The HT Easy GA4 plugin can help you easily set up Google Analytics 4 (GA4) and track eCommerce events on your WordPress site.
- For Shopify users: The Analyzely Google Analytics 4 app allows seamless integration of GA4 tracking with your Shopify store, enabling comprehensive eCommerce tracking without complex setups.
Setting Up eCommerce Tracking Directly Adding JavaScript to Your Site
Step 1: Add GA4 Tracking Code to Your Site
In Google Analytics, access the Admin section, open Data Streams, choose the appropriate data stream, and then click on View Tag Instructions.

Choose Install Manually, you will find a gtag.js tag. Copy this code and paste it into the <head> section of your website’s HTML on every page.

Step 2: Implement eCommerce Events with Custom Code
You’ll need to add JavaScript code for each specific eCommerce event directly on your site’s pages. The primary events include:
- view_item (when a product page is viewed)
- add_to_cart (when an item is added to the cart)
- begin_checkout (when the checkout process is started)
- purchase (when a purchase is completed)
Here is an example of how to implement each event:
view_item Event (Product Page View):
gtag('event', 'view_item', {
    currency: 'USD',
    value: 50.0,
    items: [{
        item_id: 'P12345',
        item_name: 'Product Name',
        price: 50.0,
        quantity: 1
    }]
});
add_to_cart Event:
gtag('event', 'add_to_cart', {
    currency: 'USD',
    value: 50.0,
    items: [{
        item_id: 'P12345',
        item_name: 'Product Name',
        price: 50.0,
        quantity: 1
    }]
});
begin_checkout Event:
gtag('event', 'begin_checkout', {
    currency: 'USD',
    value: 100.0,
    items: [{
        item_id: 'P12345',
        item_name: 'Product Name',
        price: 50.0,
        quantity: 2
    }]
});
purchase Event:
gtag('event', 'purchase', {
    transaction_id: 'T12345',
    currency: 'USD',
    value: 100.0,
    tax: 5.0,
    shipping: 10.0,
    items: [{
        item_id: 'P12345',
        item_name: 'Product Name',
        price: 50.0,
        quantity: 2
    }]
});
Replace values like currency, value, item_id, and transaction_id dynamically with your product details.
Step 3: Verify Events in GA4
Go to realtime reports in GA4 to verify that these events are tracked properly.

Setting Up eCommerce Tracking Using Google Tag Manager (GTM)
Requirements: Google Tag Manager account, GA4 Property, a basic understanding of GTM.
Step 1: Create a GA4 Configuration Tag in GTM
- Log in to your Google Tag Manager account.
- Choose your container (the one associated with your site).
- Enter your Measurement ID from GA4 (found in GA4 under Admin > Data Streams).
- Set the trigger as All Pages to track general data across your site.
- Save and publish the tag.
Step 2: Create eCommerce Event Tags in GTM
- In GTM, create a new tag for each eCommerce event you want to track (e.g., Add to Cart, Purchase, Begin Checkout).
- Set Tag Type to GA4 Event and name the event according to the action you’re tracking (e.g.,
add_to_cart,purchase). - Under Event Parameters, map the required GA4 parameters (e.g.,
item_name,currency,value). - Add triggers to fire the tags when the corresponding actions occur on your site. For example:
- Purchase: Trigger on the order confirmation page.
Step 3: Publish and Test
- In GA4, check Realtime reports and Events to ensure data is being tracked as expected.
HT Easy GA4
#1 📈 Google Analytics Plugin for WordPress
🚀 Supercharge your WordPress website with analytical insights. (Including WooCommerce Report)
Setting Up eCommerce Tracking Using Plugins or Third-Party Apps
For WordPress: Using the HT Easy GA4 Plugin
Install and Activate the HT Easy GA4 plugin from the WordPress Plugin Directory.
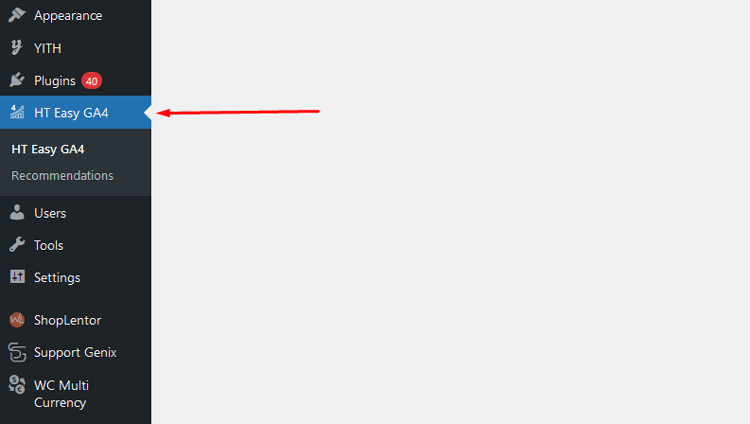
Go to Settings > HT Easy GA4 in your WordPress dashboard.
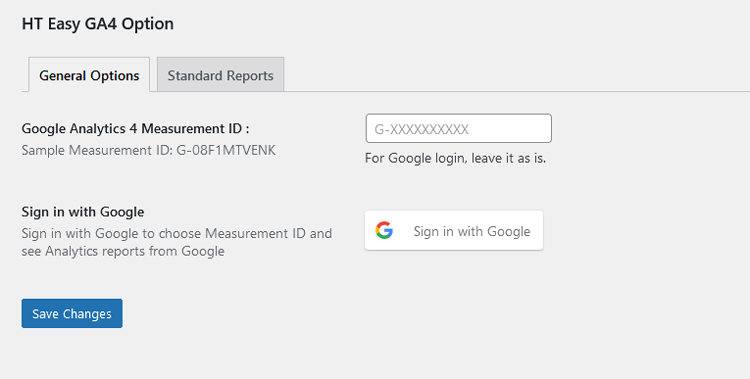
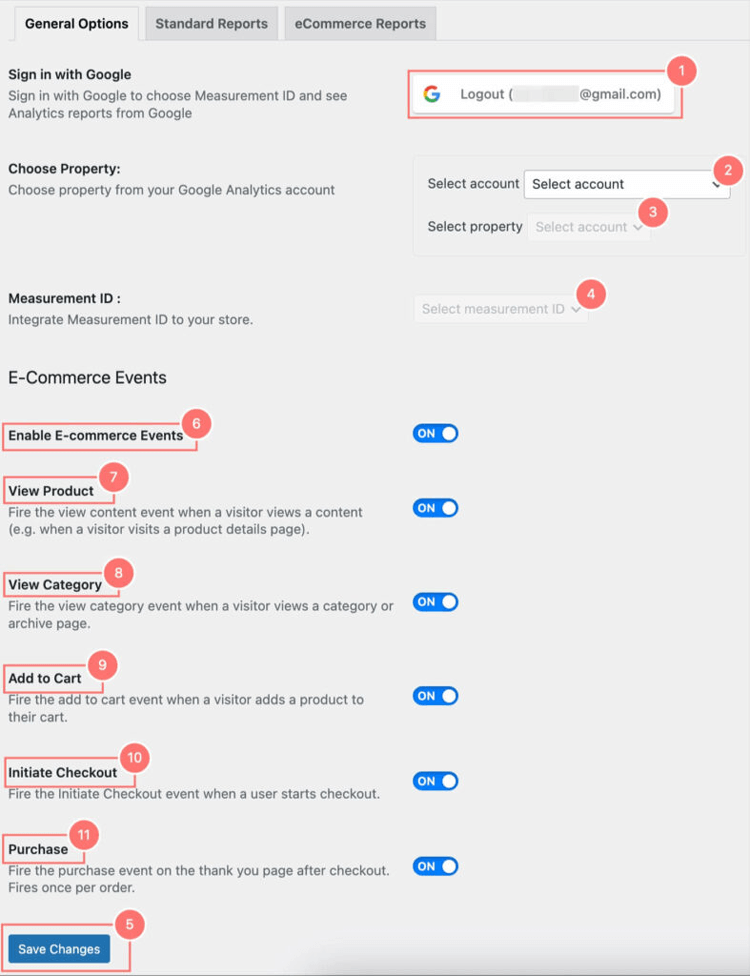
Configure Google Analytics in the HT Easy GA4 plugin effortlessly. You can do this automatically by signing in with Google or manually by entering the Measurement ID.
Enable eCommerce tracking as needed from the plugin dashboard and Save changes.
HT Easy GA4 plugins provide essential metrics like user sessions, page views, and bounce rates directly in your WordPress dashboard. With its user-friendly interface, you can track website performance, understand visitor behavior, and make data-driven decisions to improve your site’s success.
Read More: How to Install Google Analytics on WordPress: A Step-By-Step Guide
For Shopify: Using the Analyzely GA4 App
Install the Analyzely GA4 app from the Shopify App Store. Activate the app in your store.

Connect Google Analytics in the Analyzely app effortlessly by signing in with Google.

Enable eCommerce tracking and other options as needed from the app dashaboes

Click on the Finish Button to Complete the setup.

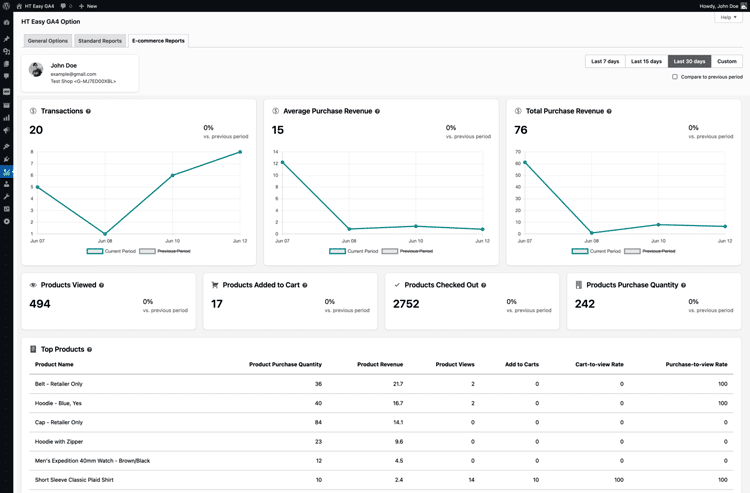
The Analyzely app provides real-time and customizable reports to monitor store visitors and sales performance. You can track active users, popular events, visitor locations, device usage, and key metrics like sessions, page views, and bounce rates.
eCommerce reports include total orders, AOV, conversion rates, and top-performing products, offering valuable insights to optimize your store and drive growth.

Read More: How to Add Google Analytics to Shopify: Most Easy Way
Interpreting eCommerce Reports in Google Analytics
Once you’ve set up eCommerce tracking in Google Analytics, the next step is understanding and interpreting the available reports. These reports provide insights into your store’s performance, customer behavior, and product success.
Here are key reports to focus on:
Overview Report
The Overview Report provides a high-level summary of your eCommerce performance. It gives you a snapshot of key metrics such as revenue, transactions, conversion rate, and average order value.
Key Metrics:
- Revenue: Total income generated from eCommerce transactions.
- Transactions: The number of completed purchases.
- Conversion Rate: The percentage of website visitors who completed a purchase.
- Average Order Value (AOV): The average amount spent per transaction.
Use the Overview Report to monitor your eCommerce business’s health. Track trends over time to spot growth or decline. Compare current performance to past periods to understand seasonal trends and marketing impacts.
Set goals by establishing benchmarks for key metrics like conversion rate and AOV to gauge progress against your business objectives.
Product Performance Report
The Product Performance Report provides detailed insights into the performance of individual products. This report helps you understand which products drive revenue and which may need more attention.
Key Metrics:
- Product Revenue: Total revenue generated by each product.
- Unique Purchases: The number of times a product was part of a transaction.
- Quantity: The total number of units sold for each product.
- Average Price: The average selling price of the product.
- Product Refund Amount: Total value of refunds issued for each product.
Use the Product Revenue and Unique Purchases metrics to determine your top-performing products. Monitor the Quantity metric to manage inventory levels and avoid stockouts or overstock situations.
Analyze the Average Price and its impact on sales volume to adjust pricing strategies. Review the Product Refund Amount to identify products with high return rates and investigate potential quality or satisfaction issues.
Sales Performance Report
The Sales Performance Report focuses on revenue-related metrics, providing insights into overall sales trends and the effectiveness of your sales strategies.
Key Metrics:
- Revenue: Total income from all eCommerce transactions.
- Refund Amount: Total value of refunds issued.
- Revenue per Transaction: The average revenue generated per transaction.
- Transaction ID: A unique identifier for each transaction, allowing for detailed analysis.
Use the Revenue metric to monitor sales trends over time and assess the impact of marketing efforts or seasonal changes. Keep an eye on the Refund Amount to identify patterns or spikes in returns, which could indicate issues with specific products or customer satisfaction.
Analyze Revenue per Transaction to understand your customers’ average spending behavior and find opportunities to increase it. Use the Transaction ID to drill down into individual transactions for a granular view of customer purchasing behavior.
HT Easy GA4
#1 📈 Google Analytics Plugin for WordPress
🚀 Supercharge your WordPress website with analytical insights. (Including WooCommerce Report)
Frequently Asked Questions
Is Google Analytics good for ecommerce?
Yes, Google Analytics provides comprehensive tools for tracking and analyzing eCommerce data, making it invaluable for online businesses.
Does Google Analytics track sales?
With eCommerce tracking enabled, Google Analytics can track sales and various other metrics.
How long does it take to set up ecommerce tracking?
Setting up eCommerce tracking can take a few minutes, depending on your familiarity with Google Analytics and the complexity of your eCommerce site.
Can I track individual product performance?
Yes, Google Analytics provides detailed reports on individual product performance, helping you make informed inventory and marketing decisions.
Is Google Tag Manager necessary for eCommerce tracking?
No, but it simplifies the process and provides more flexibility in tag management.
How often should I check my eCommerce reports?
Review your site’s performance regularly, at least once a week, to stay informed and make timely adjustments.
What is an eCommerce tracking number?
It’s a unique identifier for tracking transactions in eCommerce reports.
Conclusion
In today’s competitive eCommerce landscape, data-driven decisions are key to staying ahead. Setting up eCommerce tracking in Google Analytics might seem daunting, but it’s a crucial step for any WordPress-based online store.
By following this guide, you’ll be able to gather valuable insights into your customers’ behavior, optimize your marketing strategies, and ultimately boost your sales. For a streamlined setup process, consider using plugins like HT Easy GA4.
Ready to take your eCommerce game to the next level? Sign up for Google Analytics and start tracking today.