Welcome! This guide will help you install and set up the Was This Helpful plugin in just a few minutes.
Installation #
You can install the plugin using three methods:
Method 1: WordPress Admin Panel (Recommended) #
- Log in to your WordPress admin dashboard
- Navigate to Plugins → Add New
- Click Upload Plugin button at the top
- Click Choose File and select the
was-this-helpful.zipfile - Click Install Now
- After installation, click Activate Plugin
Method 2: FTP Upload #
- Unzip the
was-this-helpful.zipfile on your computer - Connect to your website using an FTP client (FileZilla, etc.)
- Navigate to
/wp-content/plugins/directory - Upload the unzipped
was-this-helpfulfolder - Go to WordPress admin → Plugins
- Find “Was This Helpful” and click Activate
Method 3: cPanel File Manager #
- Log in to your cPanel
- Open File Manager
- Navigate to
/public_html/wp-content/plugins/ - Click Upload and select the plugin zip file
- After upload, right-click the zip file and select Extract
- Go to WordPress admin → Plugins → Activate
Initial Setup (5 Minutes) #
Step 1: Access Plugin Settings #
After activation, you'll see a new menu item in your WordPress admin:
- Go to Was This Helpful in the left sidebar
- You'll see three tabs: Option, Style, and Report
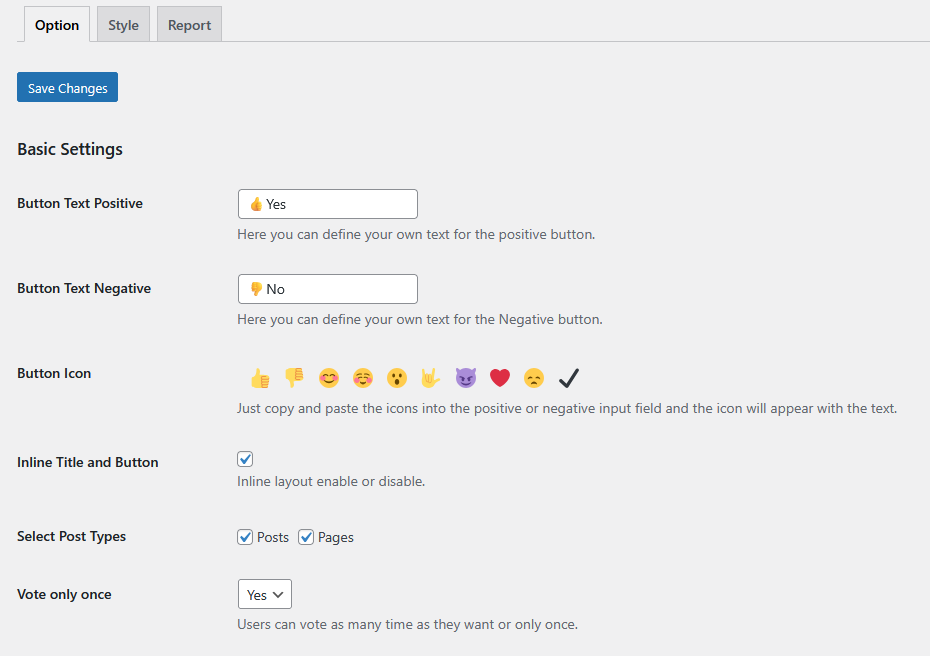
Step 2: Configure Basic Settings (Option Tab) #
- Button Text Positive: Change “👍Yes” to your preferred text (e.g., “Helpful”, “Good”)
- Button Text Negative: Change “👎No” to your preferred text (e.g., “Not Helpful”, “Needs Work”)
- Select Post Types: Check which post types should show feedback (Posts, Pages, etc.)
- Vote Only Once: Choose “Yes” to prevent duplicate votes
Click “Save Changes” at the top.
Step 3: Customize Your Question (Message Settings) #
Scroll down to the Message Settings section:
- Your Question: Change “Was this helpful?” to your custom question
- Feedback Message: “Thank you for your feedback” (appears after voting)
- Positive Response: “Good job! Please give your positive feedback”
- Negative Response: “How could we improve this post? Please Help us.”
Click “Save Changes” again.

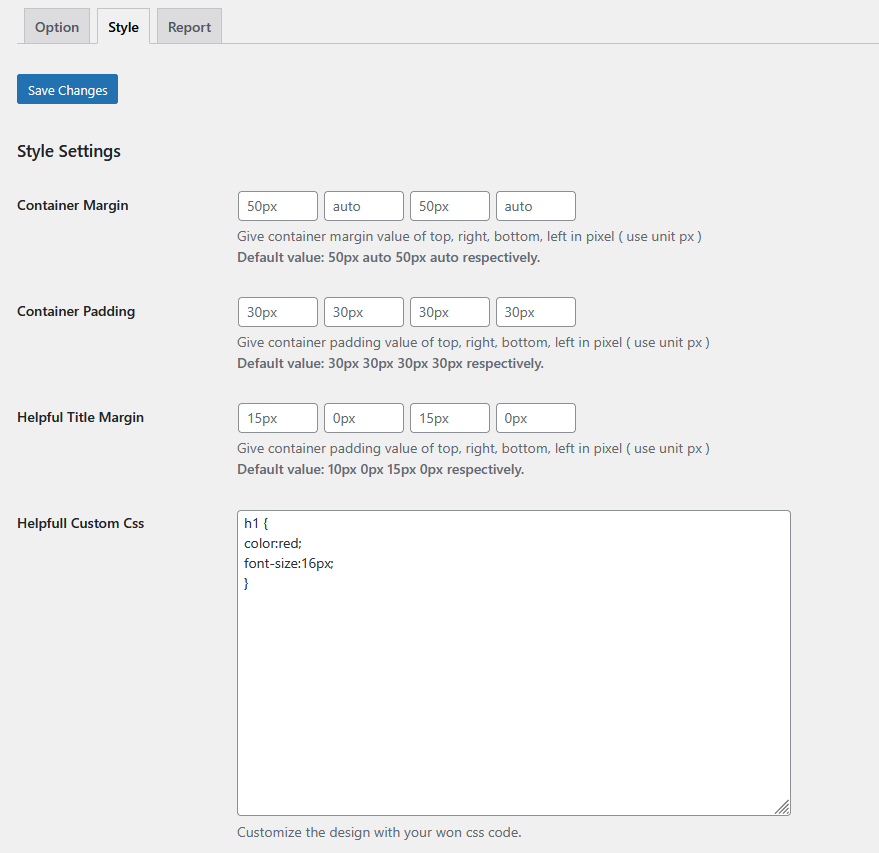
Step 4: Style Your Feedback Widget (Style Tab) #
Click the Style tab at the top:
- Adjust Container Margin and Padding if needed
- Set Feedback Button Width and Height (defaults work well)
- Choose colors for:
- Container Background Color
- Positive Button Background (green recommended)
- Negative Button Background (red/coral recommended)
- Text Button Color (white for better contrast)
Click “Save Changes”
Your First Feedback Widget #
Verify It's Working #
- Go to any published Post or Page on your website (front-end)
- Scroll to the bottom of the content
- You should see your feedback widget with two buttons
- Click one button to test the feedback flow
What You Should See: #
- Before Click: “Was this helpful?” with Yes/No buttons
- After Click: Thank you message with optional comment box
- After Submit: Confirmation that feedback was received
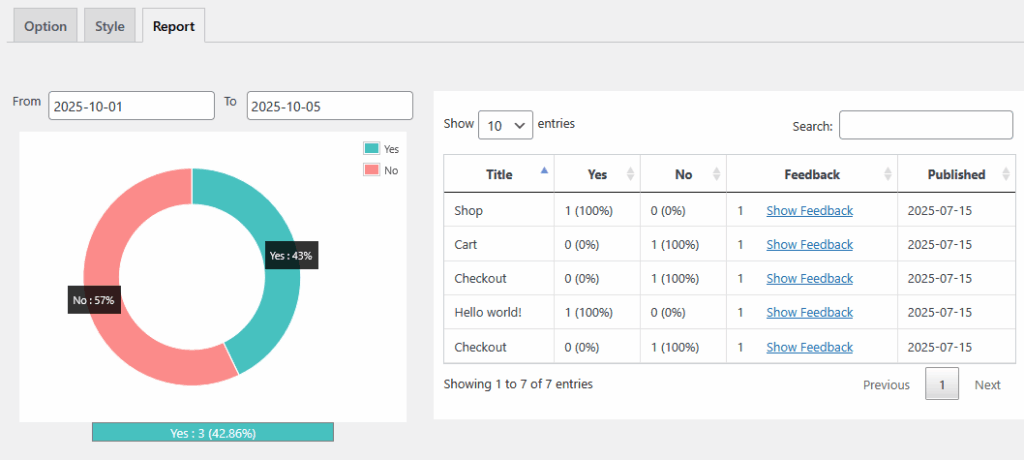
View Your First Report #
- Go back to WordPress admin
- Navigate to Was This Helpful → Report Tab
- You'll see:
- A pie chart showing Yes vs No votes
- A data table with post titles and vote counts
- Options to filter by date range
What's Next? #
Now that you have the basic setup working, explore these guides:
- Customizing Button Text & Emojis – Make buttons unique
- Styling Your Feedback Widget – Advanced design customization
- Reading & Analyzing Reports – Get insights from feedback data
- Custom Post Types Setup – Enable feedback on WooCommerce, etc.
Need Help? #
- Check our FAQ & Troubleshooting guide
Congratulations! 🎉 You've successfully set up Was This Helpful plugin. Start collecting valuable feedback today!


