How to Create a Subscription Popup on WordPress: The Beginner’s Guide
Asif Reza
- Reader Disclosure Reader Disclosure: Some of the posts on our site may contain affiliate links. Clicking may earn us a commission at no extra cost to you. Thank you for your support! Read our Disclosure
Have you seen how successful online stores use popups to collect email addresses? Smart newsletter popups can turn your website visitors into regular customers.
Research shows an exciting truth: well-designed popups can convert up to 9% of visitors. Many store owners hesitate to use popups, worrying they might annoy their customers.
Running a successful WooCommerce store means building strong connections with your customers every day. Like a helpful store assistant, newsletter popups appear at just the right moment.
These popups do more than collect emails – they create opportunities for meaningful customer connections. They help you share exciting deals, new products, and special content with interested shoppers.
When done perfectly, effective popups can triple your subscription rates and boost customer loyalty. This guide shows both beginners and experienced store owners how to create engaging subscription popups.
Let’s get started!
- Key Takeaways
- What is a Subscription Popup?
- Benefits of Using Subscription Popups
- How to Create a Subscription Popup on WordPress: Step-by-Step
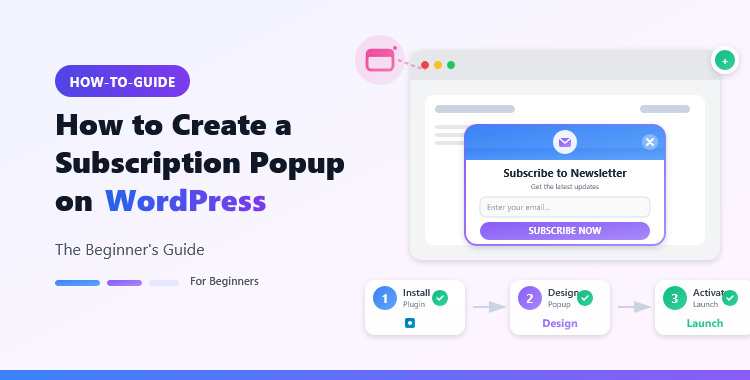
- Step 1: Install the ShopLentor Plugin
- Step 2: Access the Popup Builder
- Step 3: Create Popup Templates
- Step 4: Add a Popup Subscription Form
- Step 5: Configure Popup Settings
- Step 6: Test Everything Thoroughly
- Step 6: Publish Your Popup
- Best Practices for Designing and Implementing Subscription Popups
- Frequently Asked Questions
- Final Words
Key Takeaways
- Understand what makes subscription popups effective and how they can grow your email list.
- Learn to use a popup plugin to create professional subscription popups on your WordPress site.
- Learn to configure popup settings, timing, and conditions for maximum effectiveness with FluentCRM.
- Discover how to integrate popups with email marketing tools for seamless subscriber list management.
- Learn the best practices to create popups that enhance rather than disrupt user experience.
- Learn strategies to test and optimize your popups for better engagement and conversion rates.
What is a Subscription Popup?
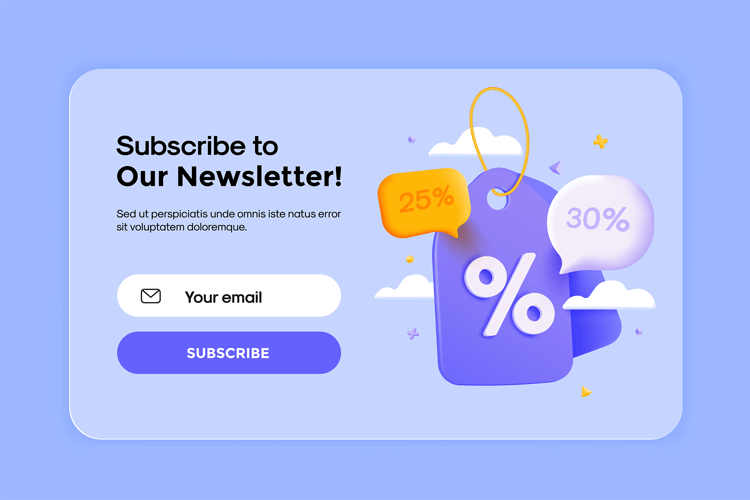
A subscription popup is a window that appears on your website to collect email addresses. It’s like a friendly message that pops up while people are browsing your online store.
These popups appear at different times – when someone visits, scrolls, or tries to leave. They’re smart enough to show different deals to different people based on their actions.
For example, new visitors might see a discount offer for their first purchase. Regular visitors could get special access to new products or exclusive content instead.
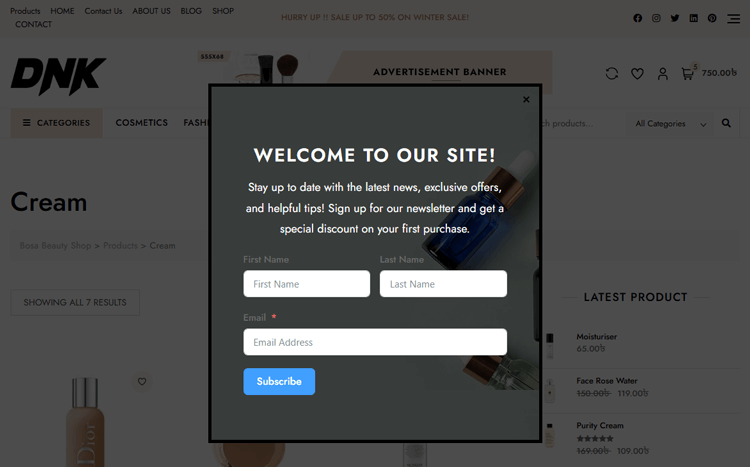
Every good subscription popup needs these five basic parts:
- A short, exciting message that makes people want to read more
- A special offer, like “Get 10% off when you sign up today.”
- A box where visitors can type their email address
- An easy way to close the popup if they’re not interested
When you use these parts the right way, your popup helps turn website visitors into subscribers. It’s important to give people something valuable in return for their email address.
Benefits of Using Subscription Popups
Using subscription popups can help your online store grow in six important ways:
- Get More People to Take Action: Popups grab attention at the perfect moment, encouraging visitors to sign up right away. They create a sense of excitement that makes people want to join in.
- Stop People from Leaving Without Buying: Special offers in popups can save sales when customers are about to leave. A good discount or free shipping offer often brings shoppers back to buy.
- Keep Customers Coming Back: Popups help start conversations with people who are really interested in your products. Once they subscribe, you can send them updates about new items and deals.
- Make More Sales: People who subscribe through popups are more likely to buy from your store. They’re already interested in your products and want to hear about special offers.
- Save Money on Marketing: Email marketing costs less than many other ways to reach customers you care about. Your email list becomes a valuable tool for sharing future sales and updates.
Recommended Blogs for You:
👉 How to Add a Newsletter Popup in WooCommerce
👉 Learn How to Use the Psychology of Popups to Boost Signups by 250%
👉 10 Essential Tips for Creating an Email Popup
👉 How to Add a Popup on WordPress WooCommerce Site: A Comprehensive Guide
👉 What are Popup Builders? A Beginner’s Guide
How to Create a Subscription Popup on WordPress: Step-by-Step
There are many popup builder plugins available for WordPress. However, in this section, we will focus on creating a subscription popup using ShopLentor. With its easy-to-use popup builder module, ShopLentor allows you to design and customize popups effortlessly. To create a subscription popup on your WordPress site, ensure you have the necessary prerequisites:
- ShopLentor plugin
- An email marketing tool (like FluentCRM or MailChimp)
- WordPress with WooCommerce installed
let’s follow these step-by-step instructions to create an engaging subscription popup for your website.
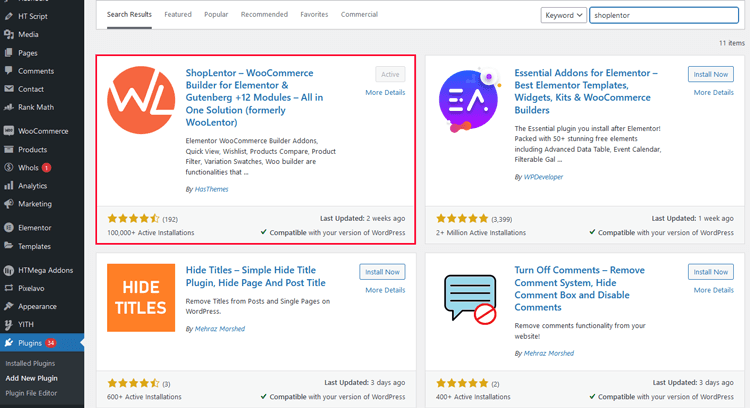
Step 1: Install the ShopLentor Plugin
- Open WordPress Dashboard
- Search for ‘ShopLentor’
- Click ‘Install Now‘ and then ‘Activate.’
If you want to use ShopLentor Pro, upload the Zip file after purchasing it. The documentation on how to install ShopLentor Pro can help you learn more.
Step 2: Access the Popup Builder
After the ShopLentor plugin is activated, find ‘ShopLentor’ on the sidebar of your WordPress Dashboard. Click on it to access the settings.
Open the “Module” tab within ShopLentor.
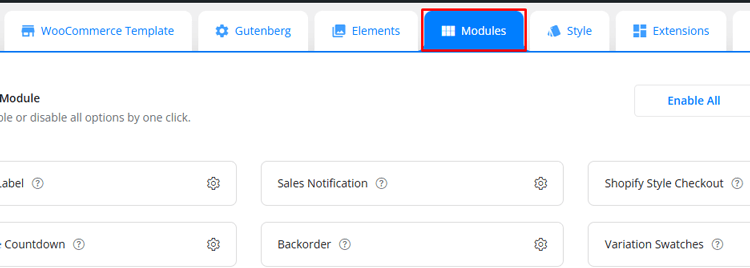
Select ‘Popup’ from the list of available modules and enable it.
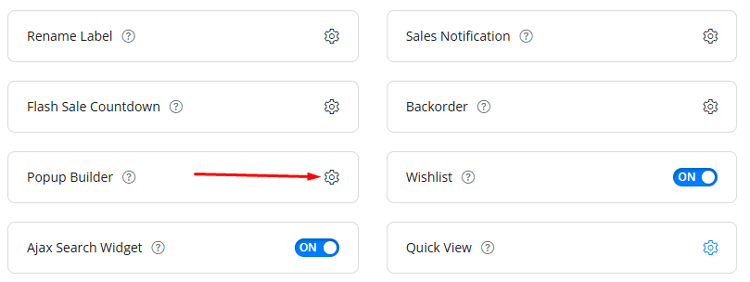
Click the ‘Save Changes’ button.
Step 3: Create Popup Templates
To create a popup template using the ShopLentor’s Popup Module, follow these simple steps:
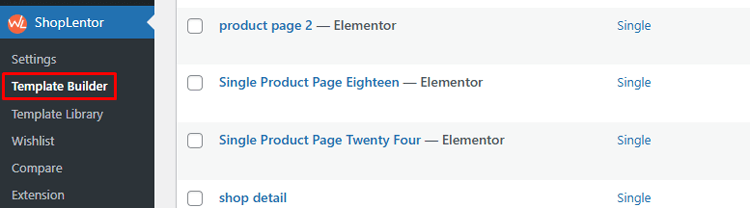
Go to the ShopLentor and Click on “Template Builder,”
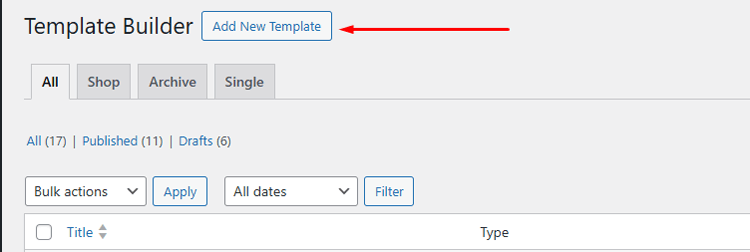
Now, Click on “Add New Template” to begin.
A popup window titled “Template Settings” will appear, providing various fields to fill out.
- Select “popup” as the template type in the “Type” field.
- Choose Elementor as your preferred editor when creating the template.
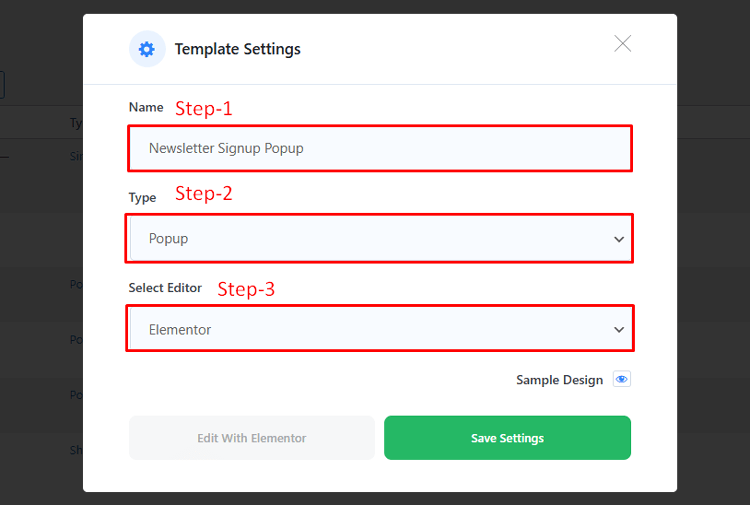
Pro Tip: Make sure Elementor is already installed and activated before this step.
Step 4: Add a Popup Subscription Form
Now that you’ve designed your popup with ShopLentor, it’s time to add your subscription form to the popup. Here’s how to do it:
1. Install and Activate FluentCRM
First, ensure that FluentCRM is installed. If not, install the plugin.
- Access your WordPress dashboard and go to the “Add Plugin” option.
- Use the search bar to find FluentCRM in the plugin directory.
- Click “Install” and then “Activate” to enable FluentCRM on your WordPress site.
Now, FluentCRM is ready to use to create subscription forms.
2. Create a List and Tags (Optional)
Organize and segment your target customer for better targeting:
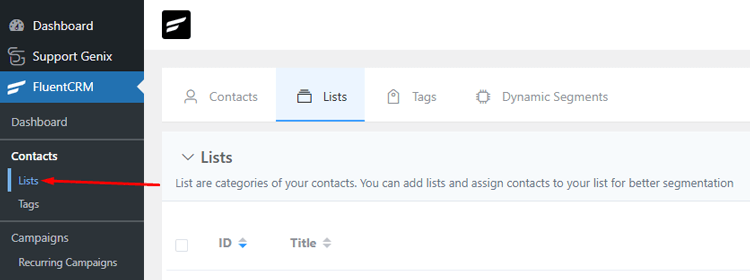
Navigate to FluentCRM > Contact in your dashboard.
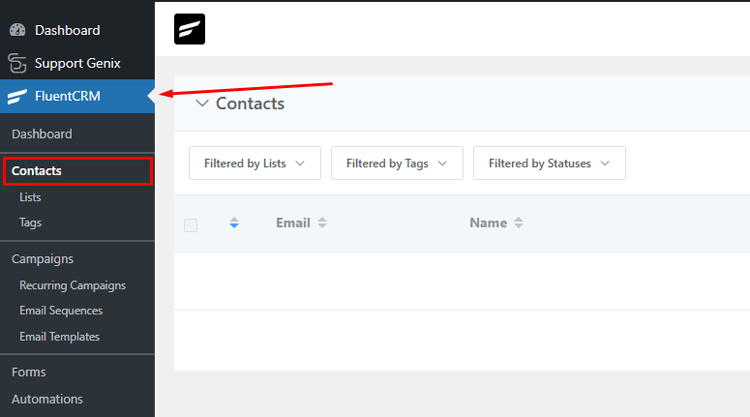
Click Lists or Tags to begin creating them.
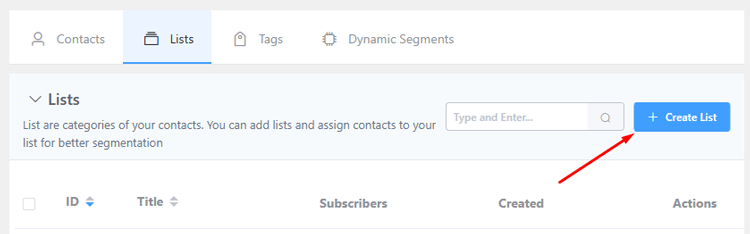
To create a List:
Click “Create List.”
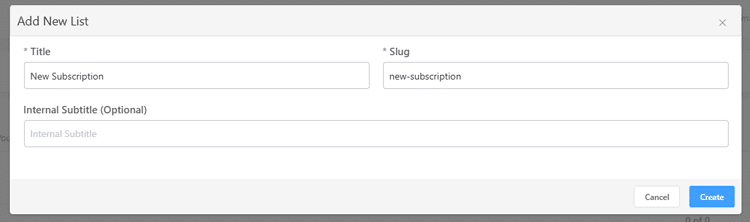
Enter a title, slug, and optional internal subtitle. Click “Create.”
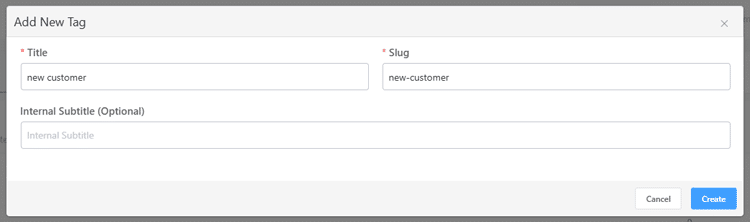
To create a Tag:
Click “Create Tag.”
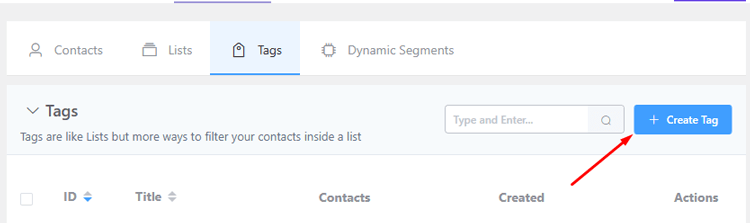
Add a title, slug, and optional subtitle. Click “Create.”
3. Create Your Subscription Form
In FluentCRM, create the form that visitors will use to subscribe:
Navigate to Forms
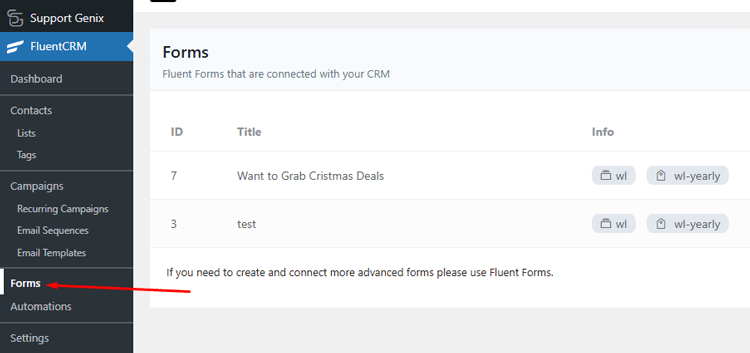
and click “Create a New Form.”
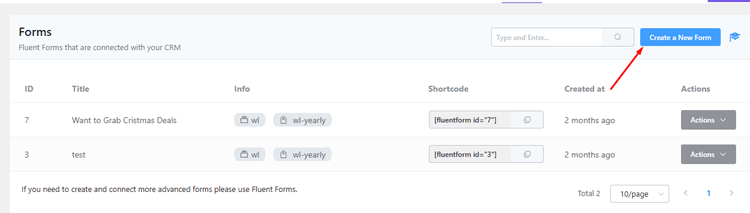
Select a pre-built template or start fresh.
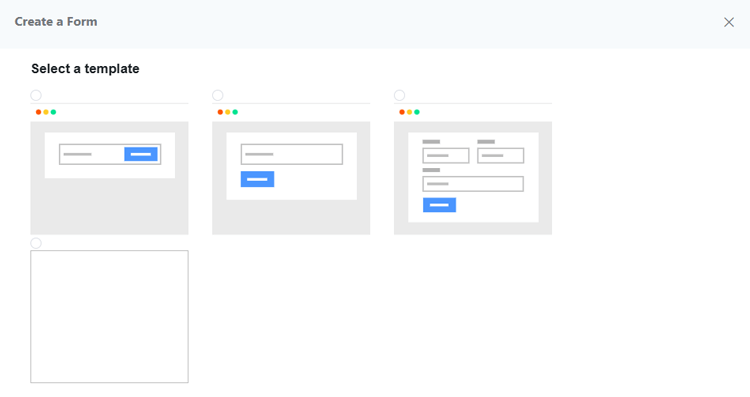
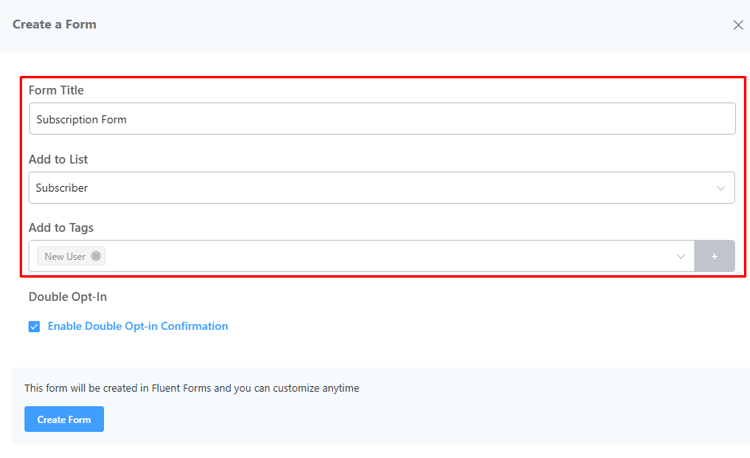
Enter the form title and assign it to a List and Tags you’ve created.
Customize the form fields and design as needed.
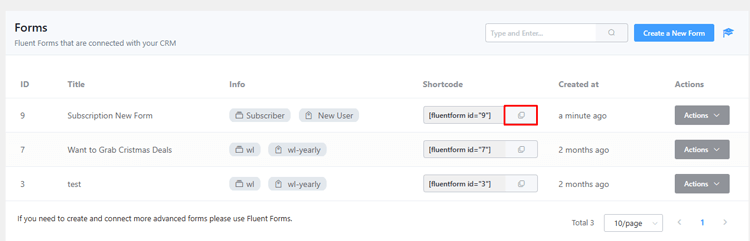
4. Copy the Shortcode
Once your form is ready, copy its shortcode. It will look like this: .
5. Add the Form to Your Popup
- Open the ShopLentor popup template editor.
- Paste the shortcode you copied from FluentCRM into the popup content area.

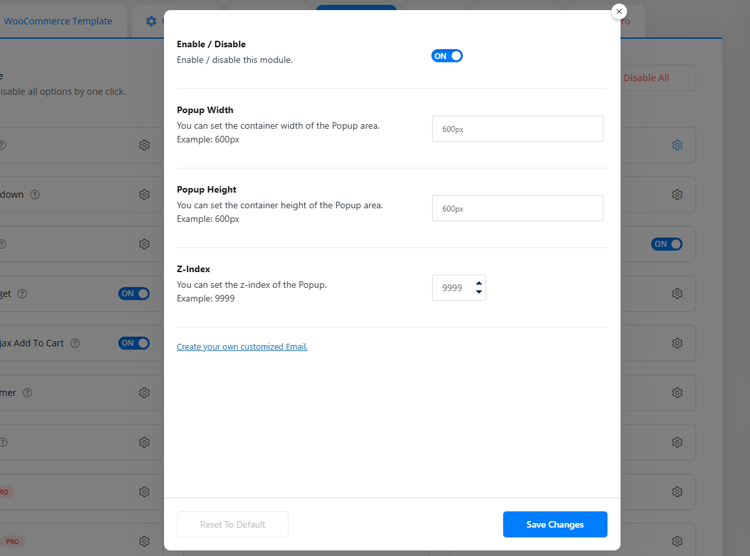
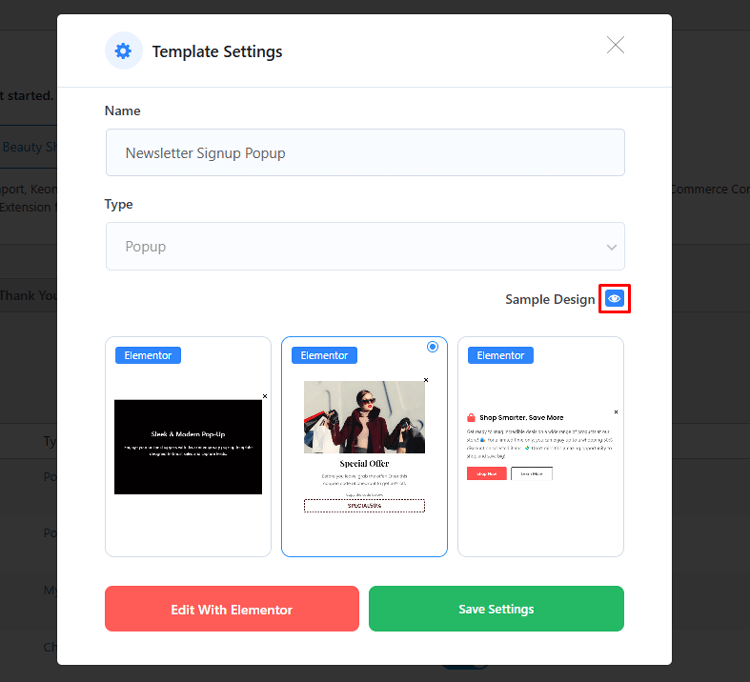
Step 5: Configure Popup Settings
To personalize your popup template, click ‘Sample Design’ and select a design. Then, click ‘Save Settings’ to save your choice.
Next, click ‘Edit with Elementor’ to access the Elementor edit screen and easily modify the layout with your desired image and text.
For further customization, navigate to the popup settings option in Elementor. Here, you can use condition settings to fine-tune the popup behavior and timing.
Set multiple conditions to control when and where your popups appear precisely. You can apply conditions globally or exclusively to specific pages, allowing for granular control.
The trigger settings enable you to determine when popups should appear. Options include page load, scroll, click, inactivity, or exit intent.
In the general settings section, you’ll find customization options for behavior, including disabling page scroll, showing or hiding the close button, and enabling dismissal via the ESC key.
Step 6: Test Everything Thoroughly
Before going live, check these important things:
- Test your popup on different web browsers (Chrome, Firefox, Safari)
- Look at your popup on both computers and phones
- Fill out the form several times using different test emails
- Check if your thank you message appears correctly
- Verify that test subscribers appear in FluentCRM
Fix any problems you find:
- Make sure the form is submitted without errors
- Verify that popup timing works as planned
Step 6: Publish Your Popup
When everything works perfectly, publish your popup: Click “Save and Publish” to make your subscription popup live.
Now, your popup is fully functional. Visitors can subscribe directly through the popup, and their details will be stored in FluentCRM.
Your subscription popup is now live on your WordPress site, ready to grow your email list!
Best Practices for Designing and Implementing Subscription Popups
When creating a subscription popup on WordPress, there are some best practices to keep in mind to ensure the effectiveness of your popup. These include:
- Keep it Simple: Don’t overwhelm visitors with too much information or fancy designs in your popup. Use clean layouts with plenty of white space and stick to your website’s colors.
- Show Clear Value: Tell visitors exactly what they’ll get when they sign up for your list. Offer something useful, such as “Get 15% off your first order today!” or “Join for weekly product tips.”
- Time it Right: Wait until visitors have spent some time on your website before showing the popup. Let them read a bit of your content first, or show it when they’re about to leave.
- Test and Improve: Try different designs, messages, and timing to see what works best for your visitors. Monitor the number of people who sign up and make changes to improve your results.
Frequently Asked Questions
How do I add a subscribe pop-up in WordPress?
WordPress does not have a built-in popup feature, but you can easily create one using ShopLentor. Install the plugin from your WordPress dashboard, activate it, and follow our step-by-step guide above to create your first popup.
What are the best settings for subscription popups?
The best settings include targeting specific user actions, like exit-intent or scroll triggers, for optimal engagement. Use clear, concise messaging with strong CTAs and a visually appealing design. Set frequency limits to avoid user annoyance and improve conversion rates for your subscription popups.
How do I integrate popups with email marketing services?
Most WordPress plugins offer direct integrations with email services like MailChimp or FluentCRM. Within the plugin settings, you can configure API keys and map form fields to email lists. Syncing popups ensures the automatic addition of subscribers to your email campaigns, ensuring seamless workflows.
How can I increase subscription popup conversion rates?
You can offer immediate value through exclusive content or first-purchase discounts. Keep form fields minimal, asking only for essential information. Use action-oriented button text and clear benefit statements. Test different designs and messaging regularly.
What metrics should I track for subscription popup performance?
Track metrics like conversion, click-through, and abandonment rates for actionable insights. Analyze the number of new subscribers and engagement levels with email campaigns. These metrics help refine popup designs and strategies for better performance and higher ROI.
How do I make my subscription popups mobile-friendly?
Design popups using responsive templates that adapt seamlessly to different screen sizes. Use legible fonts, minimal text, and simple forms to maintain usability. Avoid full-screen popups on mobile and test across devices to ensure a smooth user experience and high conversion rates.
Final Words
Creating effective subscription popups on WordPress doesn’t have to be complicated anymore. This guide has shown you the essential steps to build engaging popups that convert visitors into subscribers.
Remember these key points for success:
- keep designs simple,
- offer real value and
- respect user experience.
Testing different approaches will help you discover what works best for your specific audience.
Focus on building genuine connections rather than just collecting email addresses. Your popup strategy should create value for both you and your visitors. Think about what your customers need and how you can help them.
Start with a clean design, clear message, perfect timing, and a mobile-friendly layout. Track your results and make improvements based on the data. A successful popup takes time to perfect.
With the tools and steps we’ve covered, you can create popups that engage without annoying visitors. Regular testing and adjustments will help you find the perfect balance for your website.
Ready to grow your email list? Take these steps and start building your subscriber community today. Small improvements each day will lead to significant growth in your email list.
Remember, your popup is often a visitor’s first impression of your business. Make it count with thoughtful design and valuable offers that show you care about their experience.
So, don’t be afraid to experiment with the design and messaging of your popup to find what works best for your website. Success comes from understanding your audience and meeting their needs.